1. Overview
This project portfolio presents my contributions towards this project, including the features implemented, technologies used and documentation written.
This project was undertaken during a software engineering module (CS2103T) offered in National University of Singapore (NUS). The objective of this project was to enhance a given 'address book' application by adding more features, tests, and to apply the software engineering practices that we are taught during the module.
My team decided to morph the address book application into a clinic management system.
Aptly named 'CLInic', it focuses on optimising efficiency for its users through the use of a Command Line Interface (hence the 'CLI' in 'CLInic'). With a CLI, users will have to navigate the application and execute commands by typing them directly on the keyboard. Alongside the CLI is the Graphical User Interface (GUI), which mainly serves as visual aids for the user with icons and coloured text in a user-friendly manner. This application uses Java as the main programming language and uses JavaFX, HTML and CSS for the GUI.
CLInic primarily serves as a complete, all-in-one solution for small clinics. It provides clinics with a interactive and efficient system that can handle patient data, medicine stock data, and even has an integrated queue management system for day-to-day clinic operations.
My main responsibility for this project was to implement the UI and storage for the application, amidst some other smaller tasks,
such as the development of the MedicalRecord attribute of the Patient.
I played the key role of adding the various UI elements to the application window and connecting them with the application logic.
2. Summary of contributions
This section serves to summarise my key contributions to this project.
-
Major enhancement 1: Added the GUI for the Patient Queue Management System (PQMS)
-
What it does: This GUI window, which resides near the top of the application window, displays to the user the current state of the PQMS.
-
Justification: Having a responsive GUI allows users to be able to refer to and read the queue easily, and to perform any commands on the queue quickly, without having to always call a
queuecommand to retrieve required queue information. -
Highlights: This feature was implemented with the help of a little HTML for the display and Javascript that allowed the updating of the information in the GUI after each command. It required a lot of synchronization between the command results, model objects and the display. This was largely handled with some event handling and scripting.
-
More details: Please refer to the Developer Guide, Section 4.6 for a detailed explanation.
-
-
Major enhancement 2: Added storage capabilities for the
MedicalRecordmodel and theMedicinemodel.-
What it does: This allows the user to be able to add and retrieve
MedicalRecordandMedicineobjects to the database easily and efficiently. -
Justification: Before this enhancement, any user action that added
MedicalRecordandMedicineto the database will not be saved once the user closes the application. We wanted the user to be able to save these information for future use as well. -
Highlights: This feature was implemented with the use of XML, similar to how
Patientobjects were saved to the file in the original addressbook-level4 application. It required the creation of anXmlAdapted-version of each model object as well as careful handling of the adding and retrieval for each model object. -
More details: Please refer to the Developer Guide, Section 3.5 for a detailed explanation.
-
-
Minor enhancements:
-
Added ability for each
Documentto appear in a pop-up window after the respectiveDocumentcommands. -
Added the GUI display for all the
Medicineobjects in the database. This GUI display replaces the left panel displaying thePatientobjects whenever aMedicinerelated command is called. -
Added
addMedicalRecordCommandthat allows user to add aMedicalRecordto a specifiedPatient.
-
-
Code contributed: Click here to view my contributed code.
-
Other contributions:
-
Documentation:
-
Improved the navigability and readability of the User Guide by separating Section 3 (Features) into sub-sections.
-
-
Enhancements to existing features:
-
Updated the GUI display under
BrowserPanelto show other information such asCurrentPatient, PQMS, andPatient.
-
-
Testing:
-
Wrote tests for all UI features to increase coverage from 75% to 79% (Pull request #111)
-
-
3. Contributions to the User Guide
Listed below are the sections I contributed to the User Guide. This shows my ability to write documentation and instructions meant for end-users of the application. |
3.1. Selecting a patient: select
Need a more detailed view of a patient? Use the select command to view a patient’s profile!
Alias: s
Format: select INDEX
|
Pro tip(s):
Selects the patient at the specified INDEX. The index refers to the index number shown in the displayed patient list. The index must be a positive integer (i.e. 1, 2, 3, …).
|
Examples:
-
find Bryan
s 1
Selects the 1st patient in the resulting list of thefindcommand.
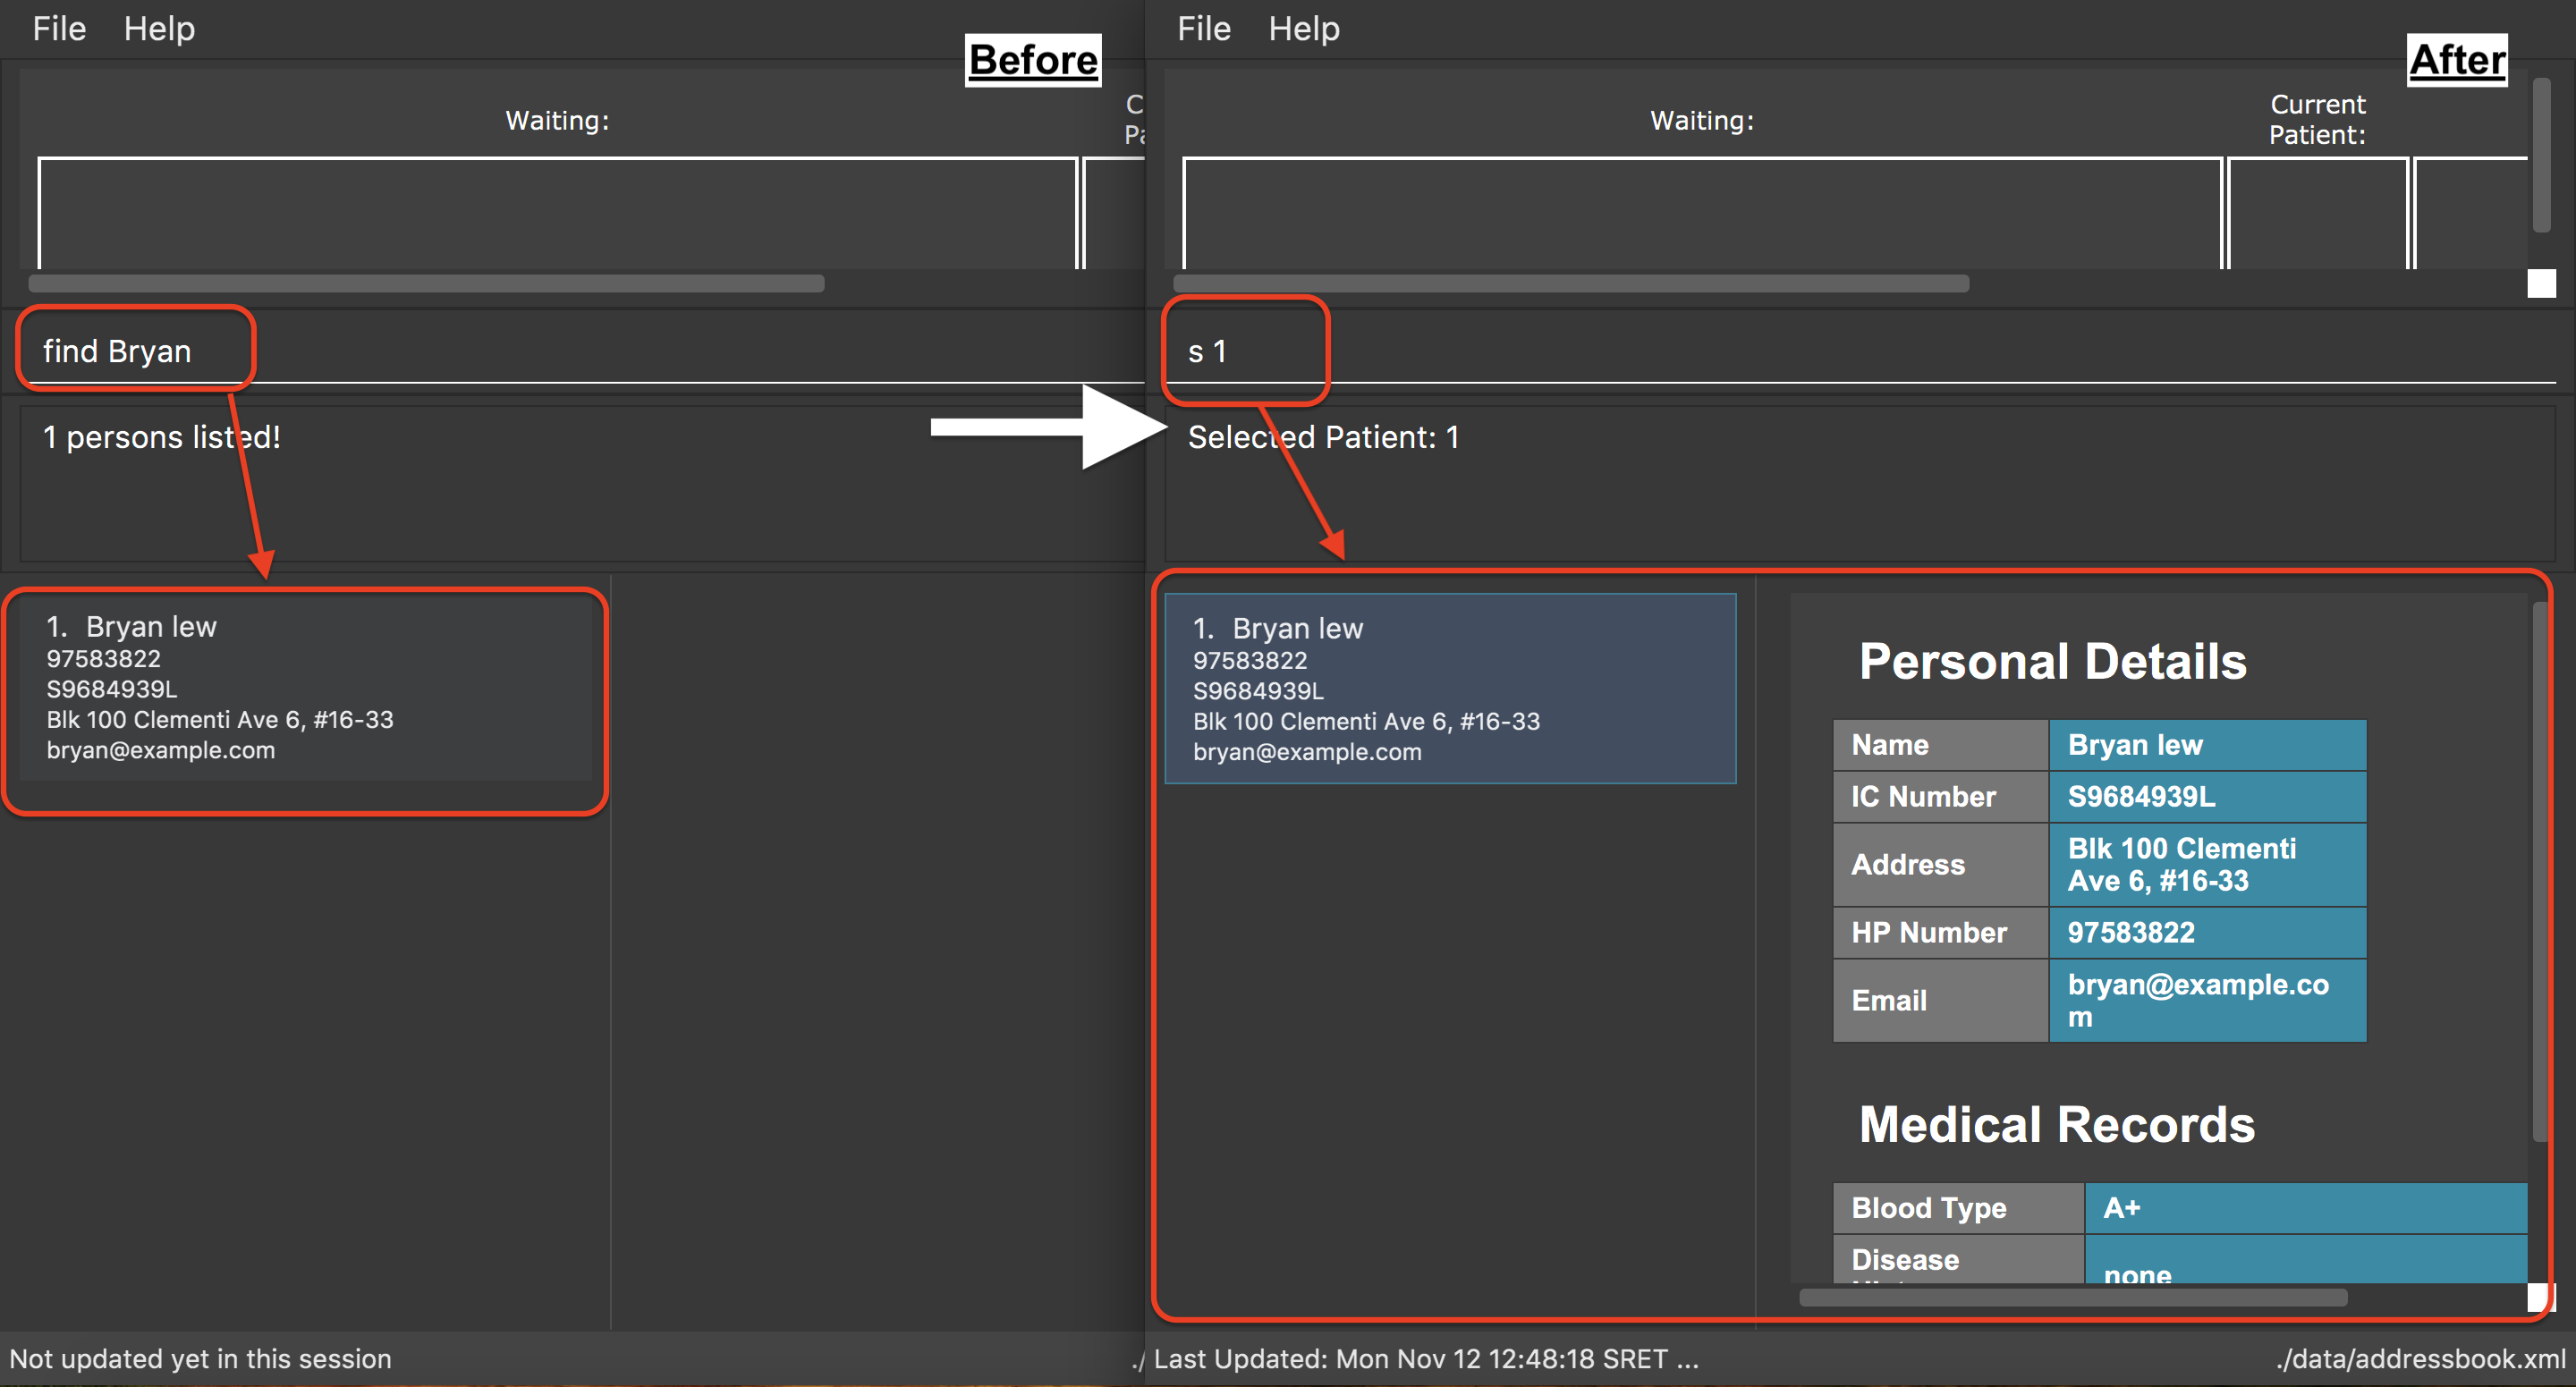
find Bryan and s 1 command.3.2. Adding medical records of a patient: addmedicalrecord
Updating a patient’s MedicalRecord on the fly is easy! Just use the addMedicalRecord command!
Alias: amr
Format: addmedicalrecord INDEX [b/BLOOD_TYPE] [d/PAST_DISEASES]… [da/DRUG_ALLERGY]… [m/NOTE]…
|
Pro tip(s):
|
Examples:
-
addmedicalrecord 5 da/Paracetamol d/Diabetes
AddsParacetamol(under Drug Allergy) andDiabetes(under Past Diseases) to theMedicalRecordof the 5th patient.
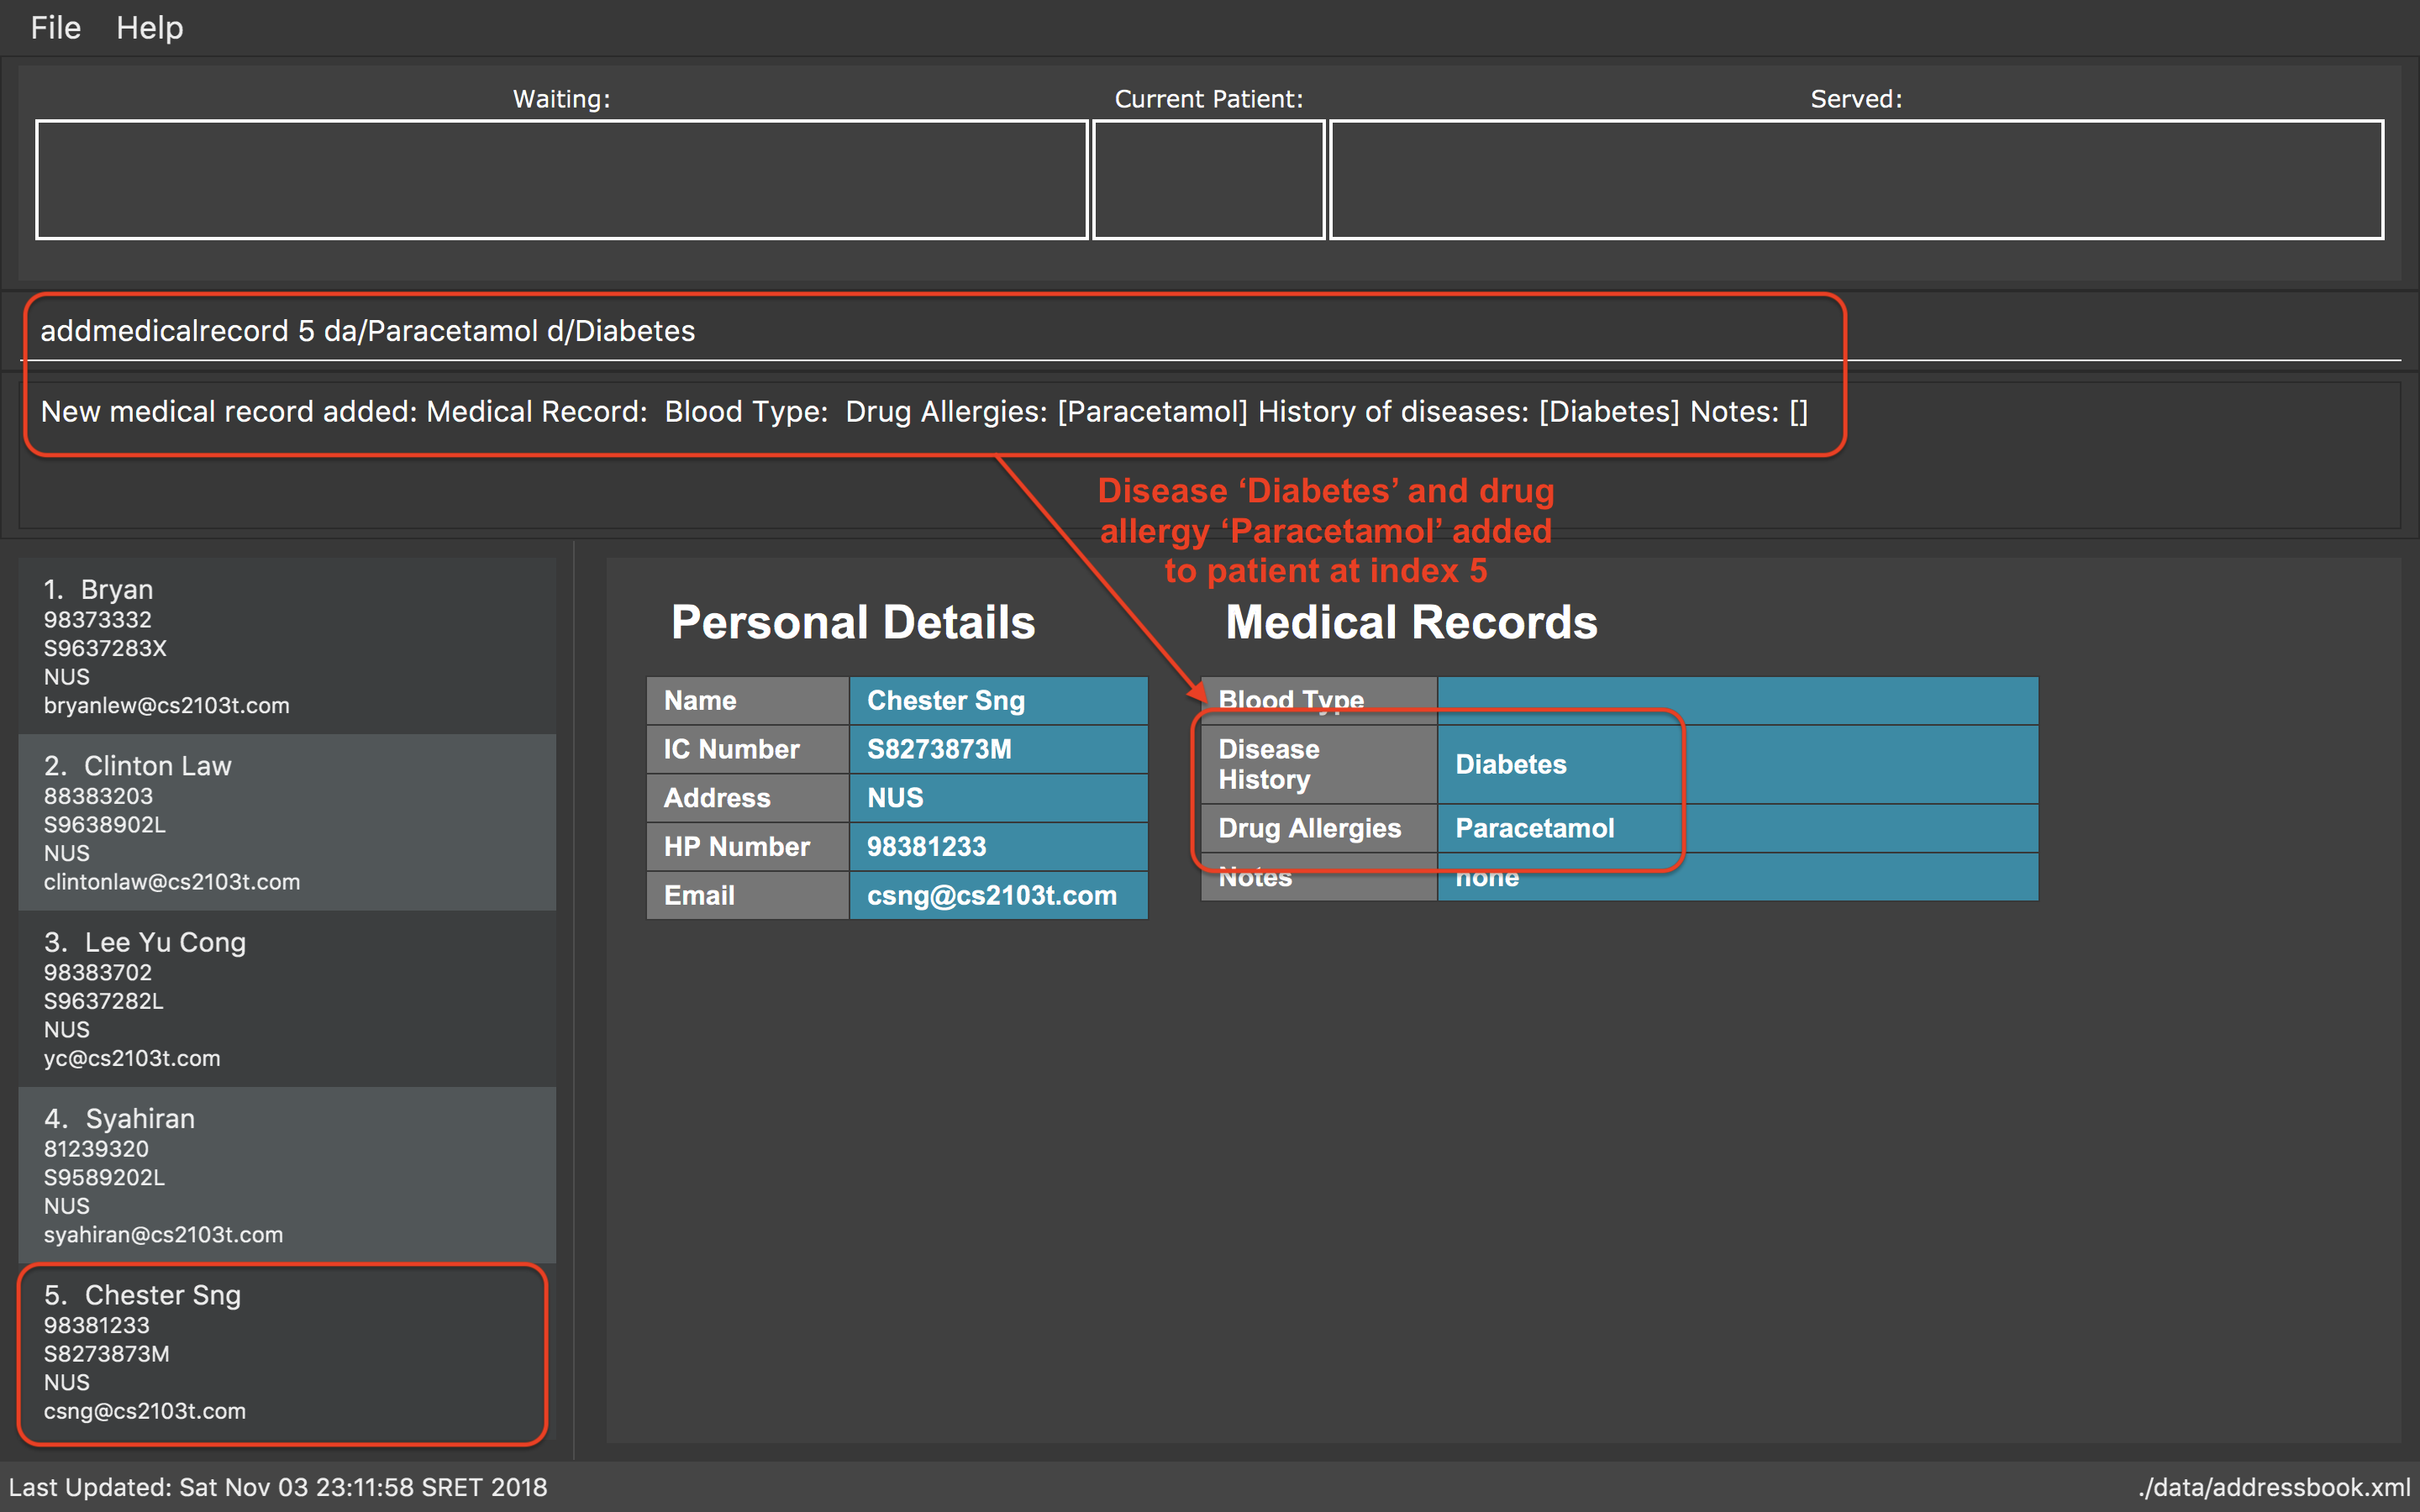
addmedicalrecord 5 da/Paracetomal d/Diabetes command-
amr 3 b/B+
AddsB+(under Blood Type) to theMedicalRecordof the 3rd patient.
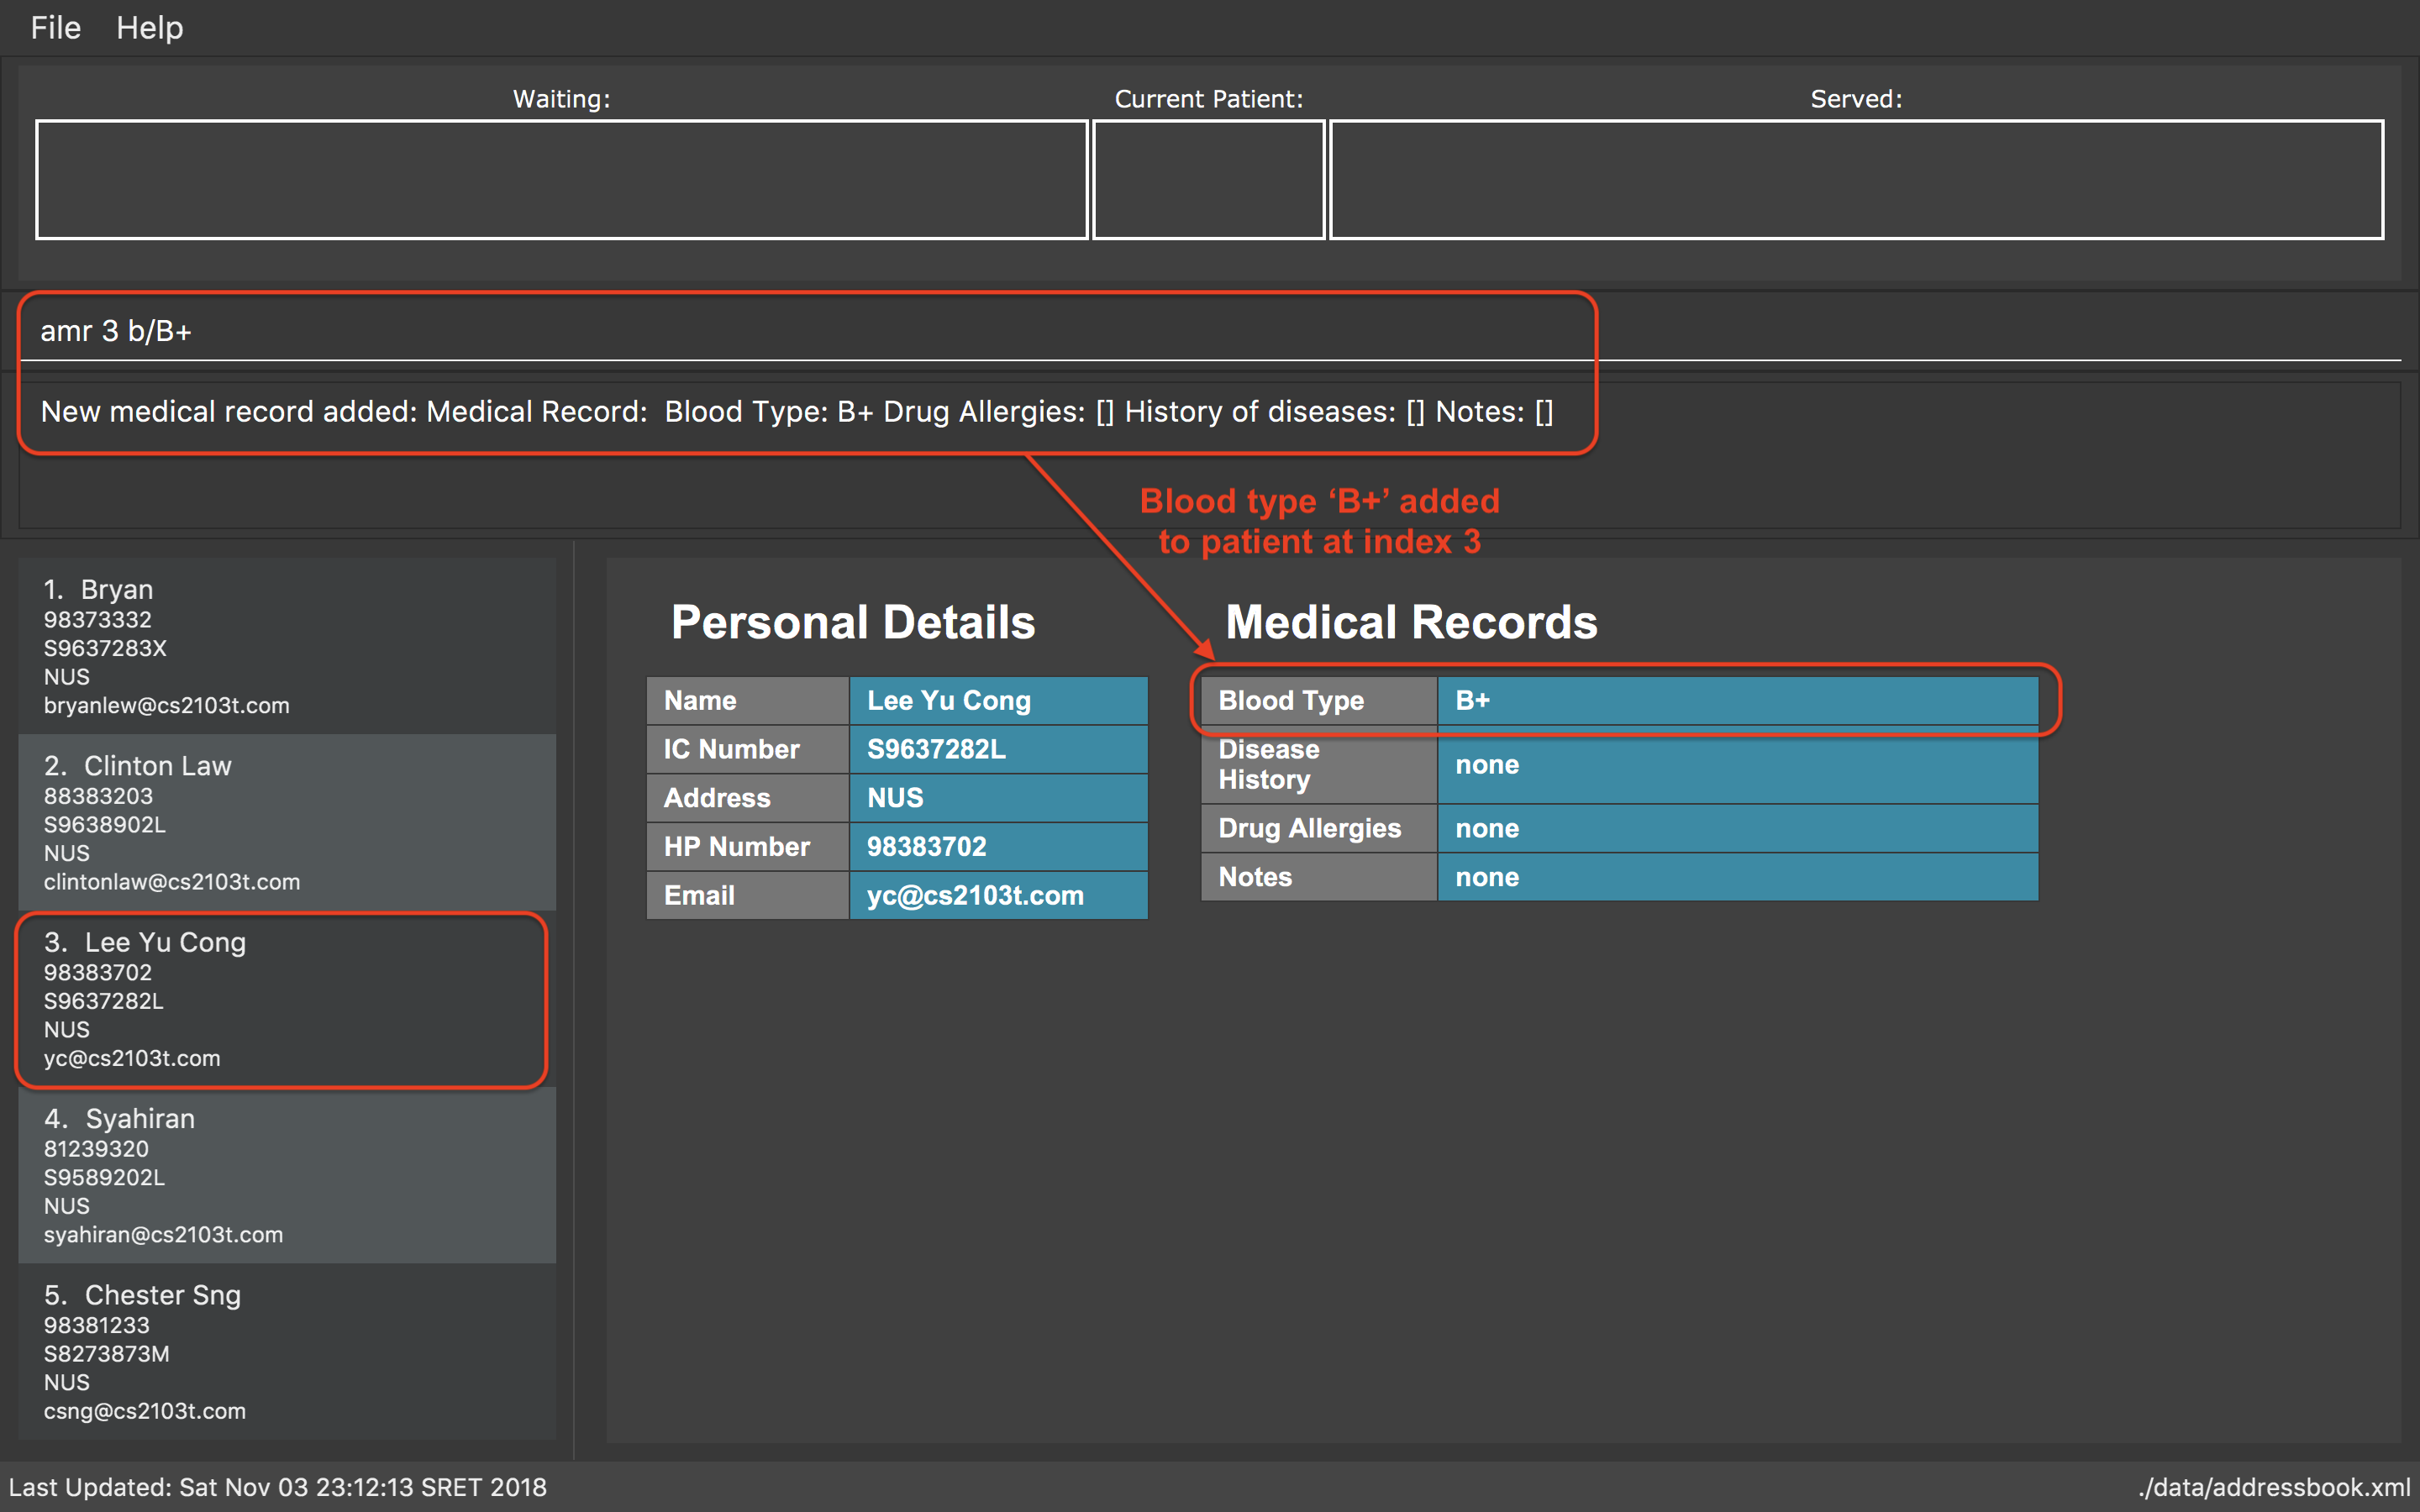
amr 3 b/B+ command4. Contributions to the Developer Guide
Listed below are the sections I contributed to the Developer Guide. This shows my ability to write technical documentation meant for developers, and also the extent of my technical knowledge of the application. |
4.1. Adding a MedicalRecord to a Patient
4.1.1. Current Implementation
The MedicalRecord class is an attribute of the Patient class, and it contains information regarding its Patient 's medical records. The MedicalRecord class:
-
has an attribute
BloodTypewhich stores the blood type of thePatient. This attribute is marked asfinaland cannot be changed. -
contains a
List<DrugAllergy>which stores the list of drug allergies that thePatienthas. -
contains a
List<Disease>which stores the list of diseases thePatienthas. -
contains a
List<Note>which stores the list of notes that belong to thePatient. EachNotefurther comprises aMessagethat stores the actual message of theNote, and aMap<SerialNumber, Quantity>attribute which is a record of theSerialNumberof theMedicineas well as theQuantitythat had been dispensed to thePatientduring that particular visit.
When a new Patient is created with the AddCommand, it is created with a default MedicalRecord object that contains an empty BloodType object, an empty List<DrugAllergy>, an empty List<Disease> and and empty List<Note>.
Users can add more information to a specified Patient 's MedicalRecord by invoking the AddMedicalRecordCommand, and specifying the corresponding arguments to add to the MedicalRecord. The arguments should be prefixed with b/ for BloodType, d/ for Disease, da/ for DrugAllergy, and m/ for Note. All the arguments here are optional arguments, however at least one must be present.
Given below is an example usage scenario and explanation for the inner workings of the AddMedicalRecordCommand.
Step 1. The user creates a new Patient object using the AddCommand. While the user has not provided any arguments for the MedicalRecord of this Patient, a empty MedicalRecord object has been initialised internally and assigned to this created Patient. Contents of this empty MedicalRecord is as detailed above.
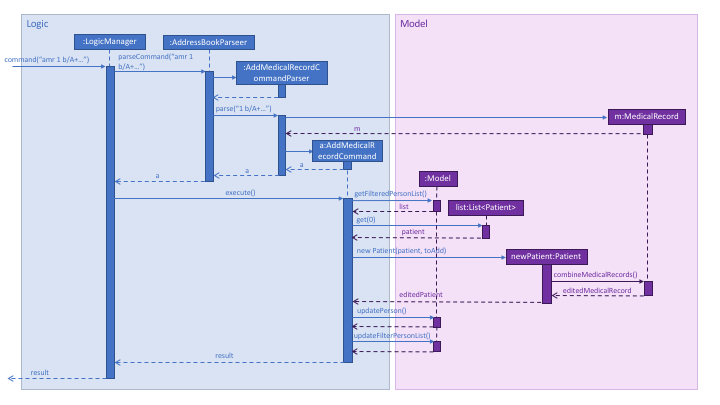
Step 2. The user wishes to add a MedicalRecord containing only the BloodType of the Patient, and will do so with the AddMedicalRecord command, and only specifiying the b/ prefix for BloodType. Note that BloodType here can only be in a specific format (A[+-], B[+-], O[+-] or AB[+-]).
When this command is executed, the program creates a new MedicalRecord object with just the BloodType specified, takes the old MedicalRecord object of the Patient (which is empty), and does a merging of the two objects, returning a new MedicalRecord object. The Patient is then updated with this new combined MedicalRecord. The following figure shows the sequence diagram for this command.
4.1.2. Design Considerations
This section lists out some of the different implementations that were considered during the designing phase of this feature, including the rationale for our choice.
Aspect: Execution of the command
-
Alternative 1 (current choice): Create a new
MedicalRecordobject and combine the oldMedicalRecordwith it.-
Pros: Easy to implement and better abstraction.
-
Cons: Redundant creation of new object only to discard it immediately.
-
-
Alternative 2: Add specified arguments of the command directly to the current
MedicalRecord-
Pros: No redundant creation of extra objects.
-
Cons: Require access to the existing
MedicalRecordfrom outside the object, which breaks the abstraction barrier.
-
4.2. Application GUI
4.2.1. Current Implementation
As an extension to the original addressbook-level4 application, more UI elements were added to the application window to serve as visual aid for the user of the application.
In particular, the real-time status of the Patient Queue Management System (PQMS) is reflected to the user via a small window near the top of the application. This is depicted in the figure below:
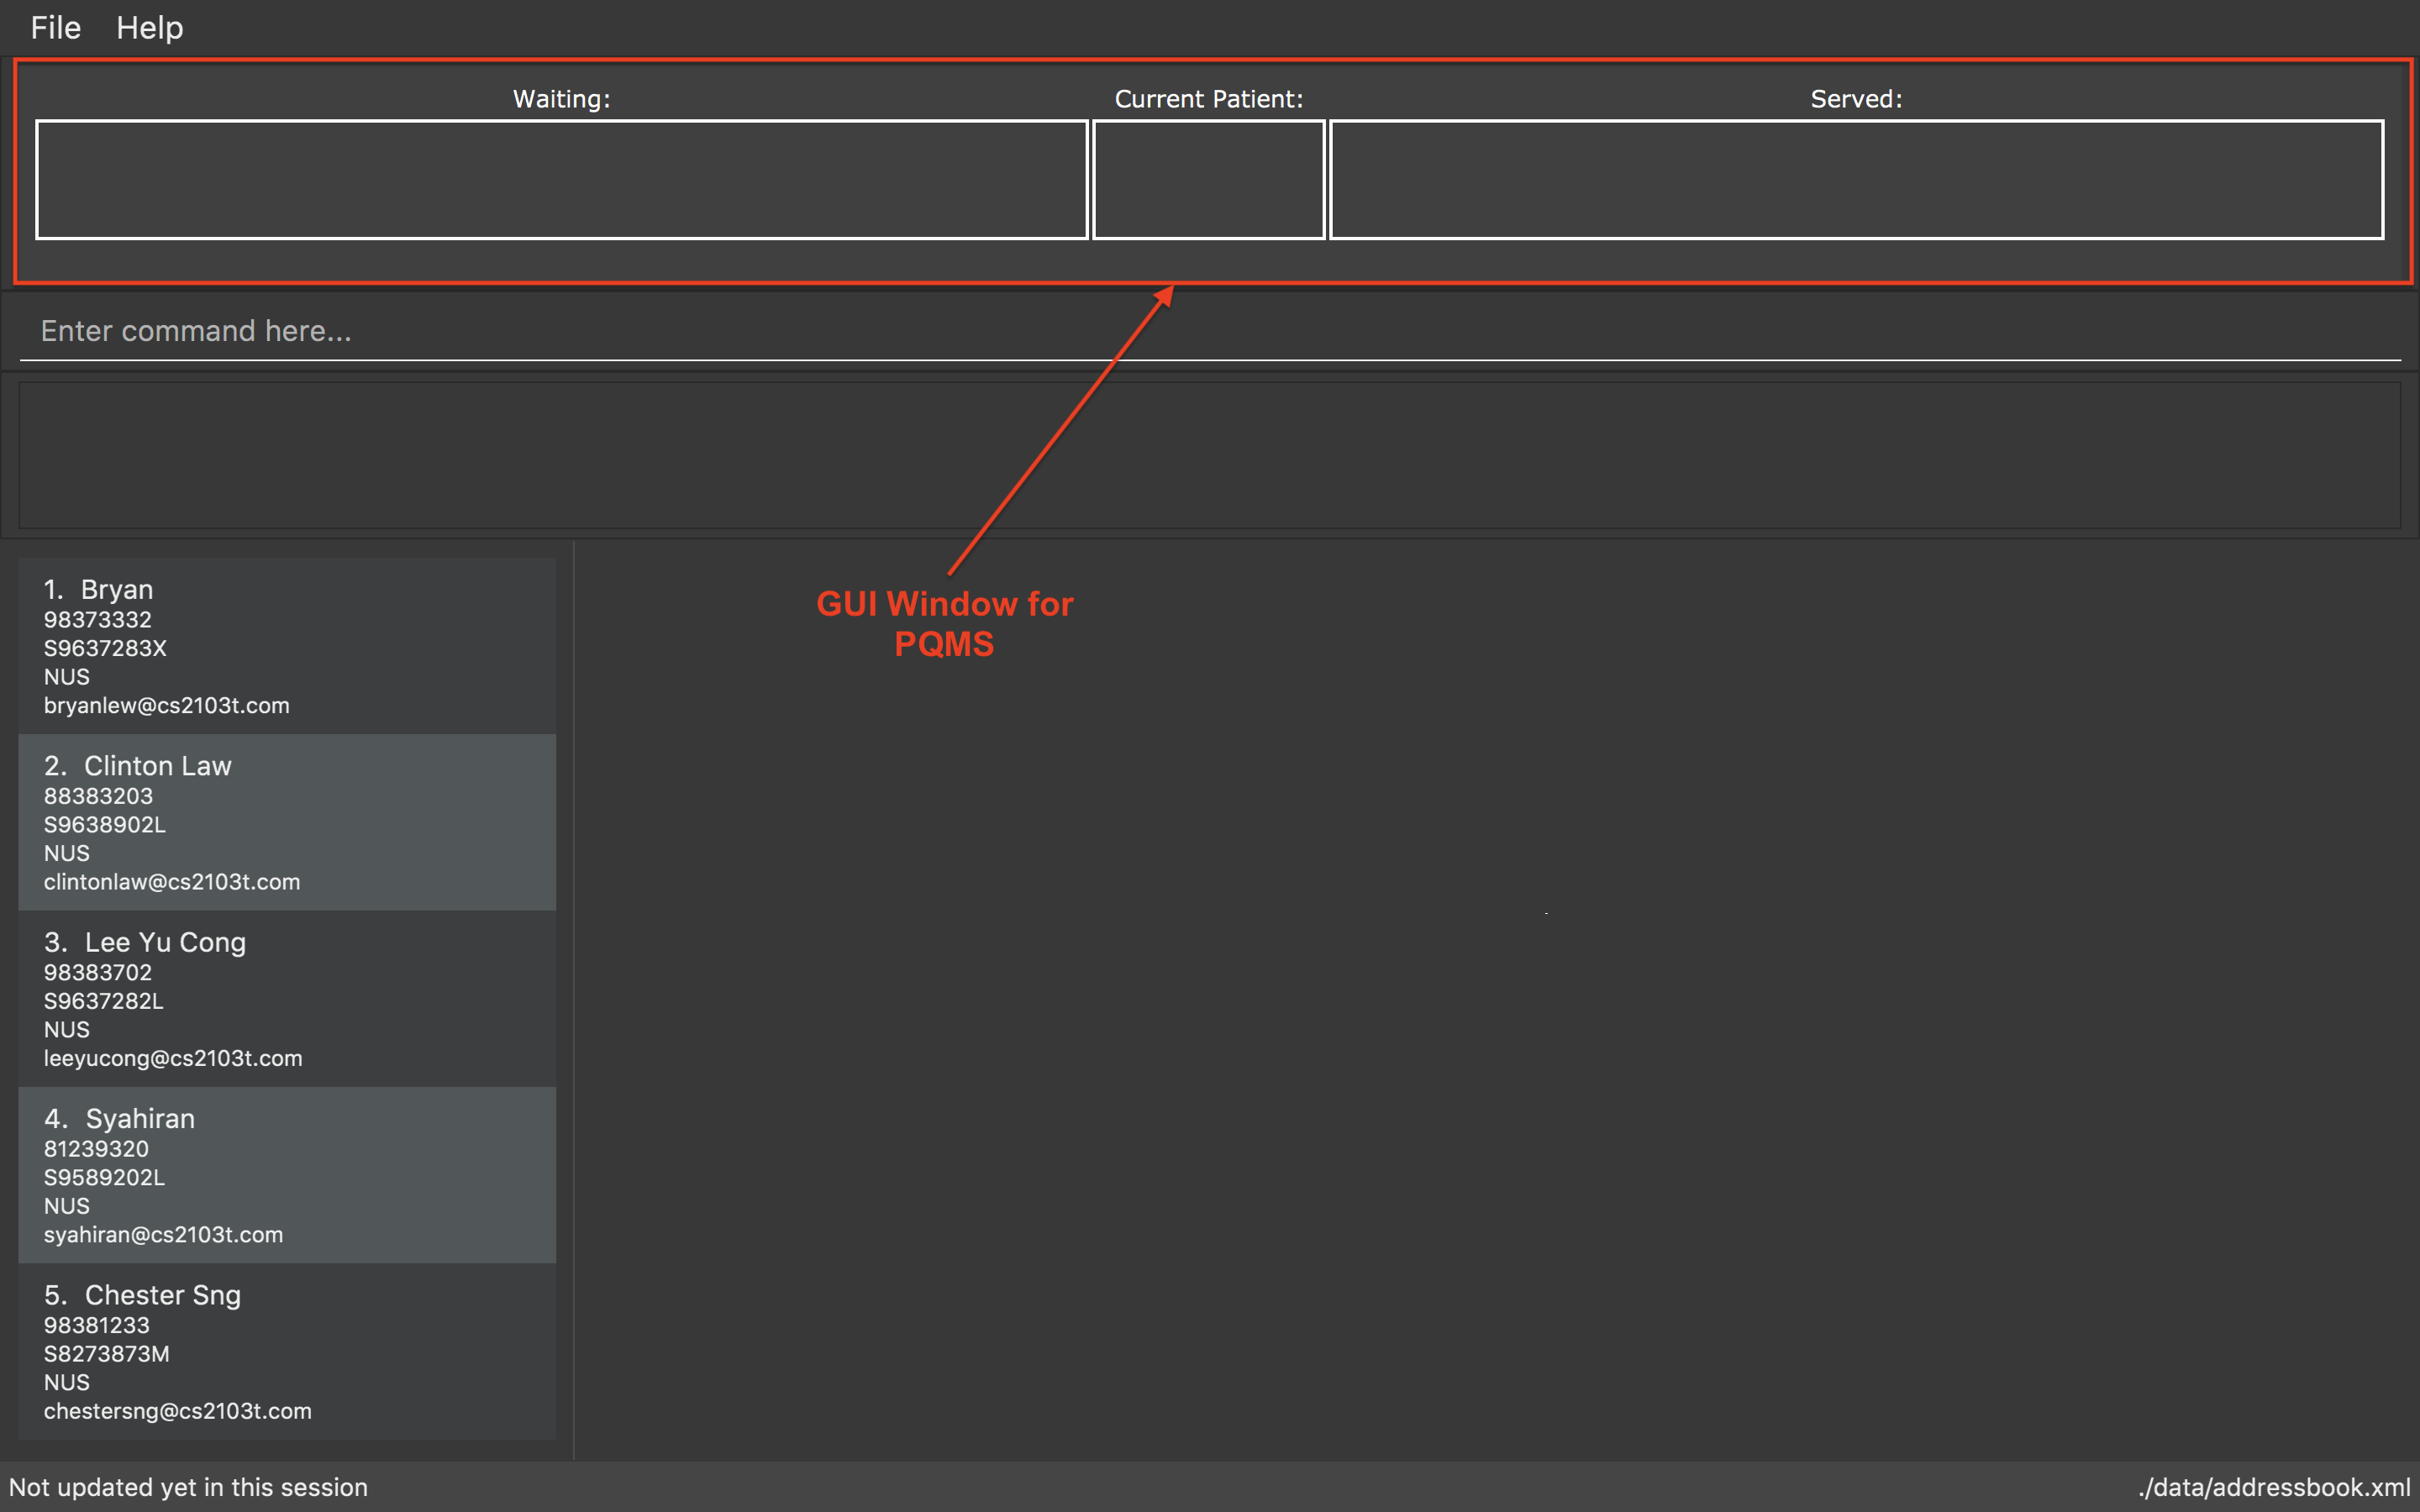
After QueueCommands such as register, serve, etc., the GUI will automatically update itself as the user enters these commands to reflect the situation of the PQMS at that exact point in time.
This UI element is implemented using JavaFX’s WebView and a local HTML file. The sequence of events for how the WebView is updated is as follows:
Step 1. On a fresh start-up of the application, the WebView is intialized with the local HTML file QueueDisplay.html that draws the labels and boxes onto the WebView.
Step 2. After each QueueCommand, a QueueUpdatedEvent is posted and the subscribed class QueueDisplay invokes the runScript() method on the WebViewScript object within the class.
Step 3. WebViewScript.runScript() simply calls an executeScript() method that subsequently executes some JavaScript code on the HTML file that will render the appropriate illustration to be displayed on the WebView.
Step 4. On each subsequent QueueCommand, steps 2 to 3 are repeated to update the display.
The following figure show the code section of the 2 methods that are responsible for the display:
/**
 * File: QueueDisplay.java
 * Loads a HTML file representing the queue display.
 */
private void loadQueueDisplay(PatientQueue patientQueue, ServedPatientList servedPatientList, CurrentPatient currentPatient) {
    List<Patient> patientQueueList = patientQueue == null ? null : patientQueue.getPatientsAsList();
    String currentPatientString;
    if (currentPatient == null) {
        currentPatientString = "empty";
    } else {
        try {
            currentPatientString = currentPatient.getPatient().getName().fullName;
        } catch (NullPointerException npe) {
            currentPatientString = "empty";
        }
    }
    List<ServedPatient> servedPatients = servedPatientList == null ? null : servedPatientList.getPatientsAsList();

    String queueDisplayPage = MainApp.class.getResource(FXML_FILE_FOLDER + DEFAULT_PAGE).toExternalForm();
    this.webViewScript.runScript(getScriptForQueueDisplay(patientQueueList, currentPatientString, servedPatients));
    loadPage(queueDisplayPage);
}
/**
* File: WebViewScriptManager.java
* This function will run script that is passed as argument.
* @param script script to run.
*/
public void runScript(String script) {
int currentCounter = this.counter;
this.webView.getEngine().getLoadWorker().stateProperty().addListener((ObservableValue<? extends Worker.State> observable, Worker.State oldValue, Worker.State newValue) -> {
if (newValue == Worker.State.SUCCEEDED && currentCounter == this.counter) {
Platform.runLater(() -> this.webView.getEngine().executeScript(script));
this.counter++;
}
});
}4.2.2. Design Considerations
This section lists out some of the different implementations that were considered during the designing phase of this feature, including the rationale for our choice.
Aspect: Implementation approach
-
Alternative 1 (current choice): Using a
WebViewto display HTML code-
Pros:
-
Easy to implement, since the code to render the display is a completely separate code. Abstraction barrier is maintained.
-
-
Cons:
-
Might face lagging issues for prolonged time usage, since one new
Listenerobject is created for each update.
-
-
-
Alternative 2: Using JavaFX to render the shapes and UI.
-
Pros:
-
Less likely to face efficiency issues since changing of the UI elements happens locally.
-
-
Cons:
-
Hard to implement.
-
-