1. Introduction
This Project Portfolio Page documents my contributions to the development of CLInic, the product of a team of five
students from NUS School Of Computing as part of the CS2103T Software Engineering module. The main
features of the application are coded in Java while the GUI is handled by JavaFX, HTML and CSS.
CLInic is a desktop application made to manage and expedite operations in clinics. The main impetus behind CLInic
was to distil the CLI’s efficiency of typing commands, as its cryptic walls of text was intimidating to the
general, non tech-savvy populous. Hence, CLInic marries the simplistic design and efficient command issuing mechanism
of the CLI with an intuitive Graphical User Interface (GUI). This culminated in an application that is easy for
anyone to use, all while providing the powerful functionalities and efficiencies offered by a CLI.
Below are some of the key features provided by CLInic:
-
Allows users to manage patient and medicine information
-
Allows users to easily generate documents to be issued by a clinic like
Medical Certificatesefficiently -
Provides intuitive workarounds to normally arduous but common administrative tasks such as restocking and dispensing medicine
I played a major role in the development of the Document class, the relevant Receipt, MedicalCertificate
and ReferralLetter classes that extend it and the relevant patient management operations that are required for
them to work.
2. Summary of contributions
-
Major enhancement: Implemented the
Documentclass, its accompanying HTML template and extending classes, which includes theReceipt,MedicalCertificateandReferralLetterclasses.-
What it does: It takes in the information of a document that is to be printed by the clinic and generates a
HTMLfile for it. -
Justification: This functionality simplifies the generation of documents that are required by the clinic. This makes the administrative tasks in the clinic easier and faster, boosting the productivity of its users, translating into shorter wait times at the clinic for the patients.
-
Highlights: This functionality allows for seamless transfer of information from doctors to receptionists of the clinic during consultation, which when coupled with the fast retrieval of information from the application’s database of
PatientandMedicineinformation, makes for efficient generation of relevant documents.
-
-
Minor enhancements:
-
Improved and helped with the implementation of
ServedPatientandServedPatientListManager, which are intermediate abstractions(placeholders) that help to 'finalise' the information to be used for the generation ofDocument. -
Integrated
MedicalCertificatewith theDocumentAddContentCommand. -
Designed the
HTMLtemplate which all the classes that extendDocumentuse to format their information.
-
-
Code contributed: View the code I have written for the project here!
-
Other contributions:
-
Enhancements to features:
-
Community:
-
Documentation:
-
3. Contributions to the User Guide
Given below are the sections I have contributed to the User Guide. They showcase my ability to write documentation targeting end-users. |
3.1. Implementation of the Patient Record Management System
Adding a patient: add
Did someone just walk in, wanting to see the doctor?
Add him to CLInic’s patient database using the add command!
Alias: a
Format: add n/NAME ic/IC_NUMBER p/PHONE_NUMBER e/EMAIL a/ADDRESS [t/TAG]…
|
Pro tip(s):
|
|
Important:
Omission of any mandatory parameters will result in the failure of adding the patient to the database.
|
Upon successful execution, you should see the patient with his details added to the patient list on the left.
Examples:
-
add n/Clinton Law ic/S9638902L p/97947435 e/clinton@cs2103t.com a/Tembusu College
Adds a patient namedClinton Law, with IC numberS9638902L, phone number97947435, emailclinton@cs2103t.comand address ofTembusu Collegeto CLInic’s patient database, as shown below.
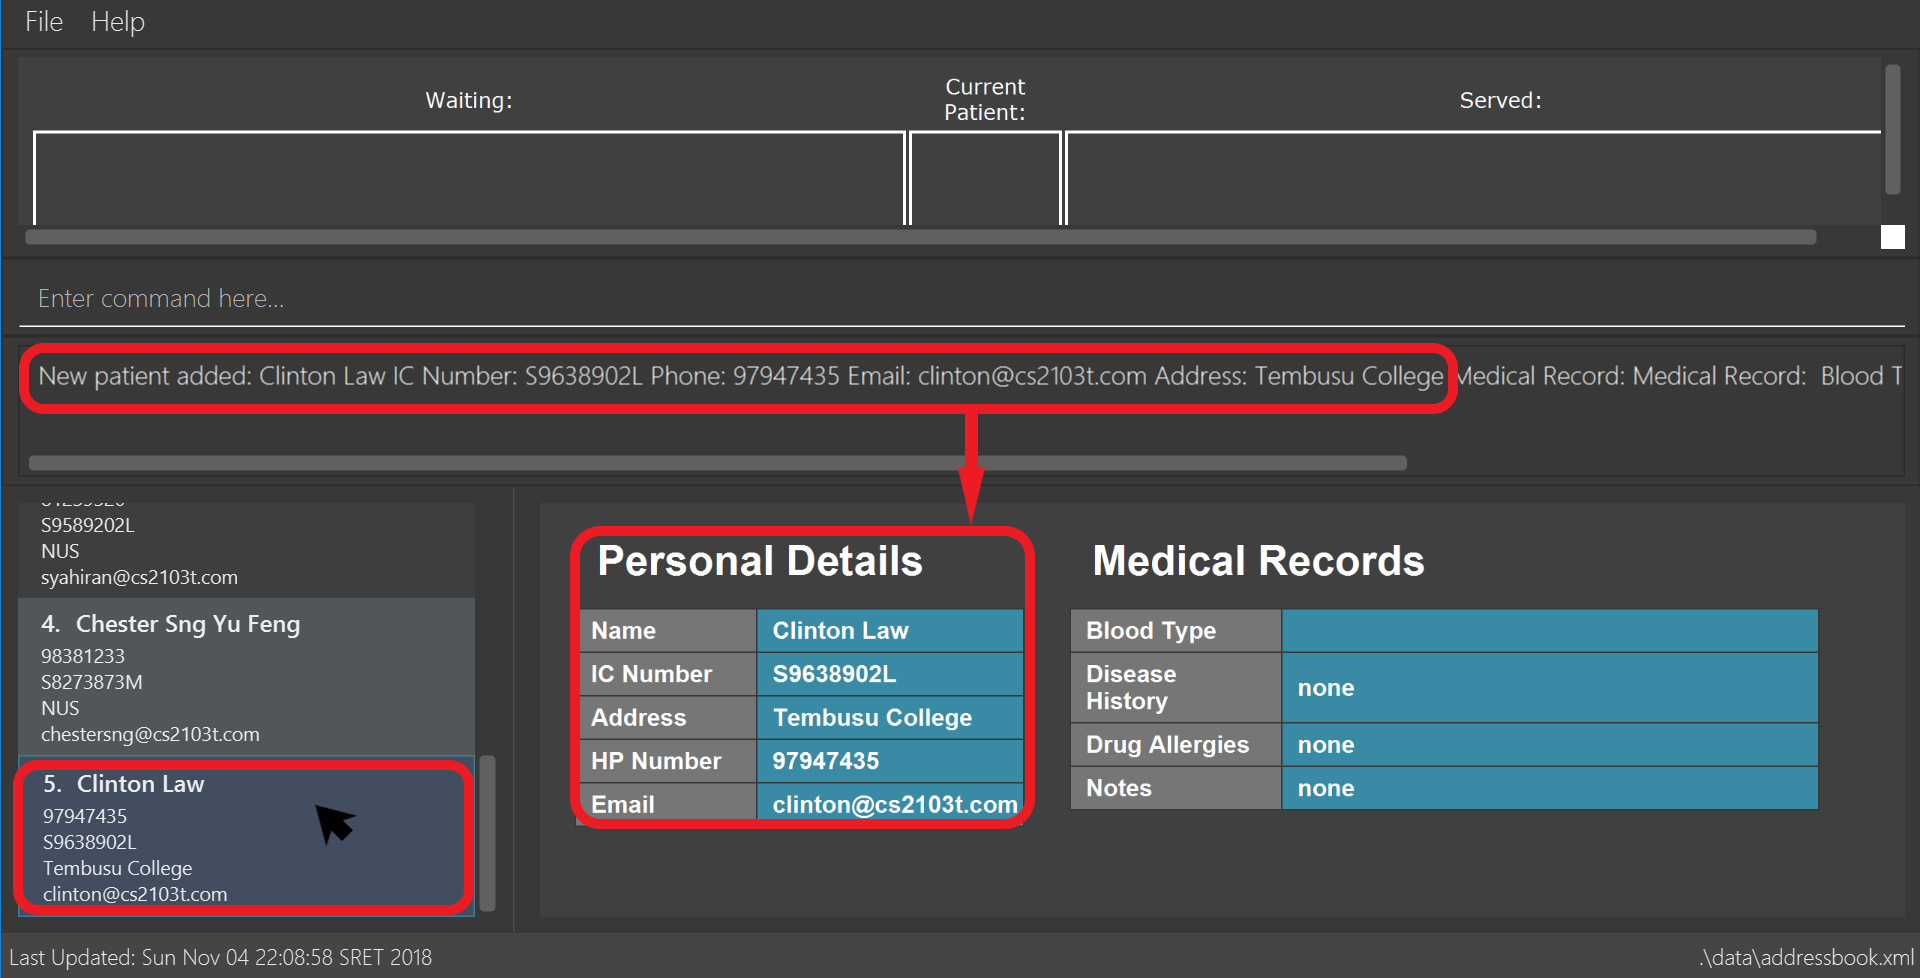
add command specified above and left clicking Clinton’s patient card in the patient list on the left, indicated by the black cursor.Editing a patient: edit
Uhoh! Made a mistake keying in a patient’s particulars? Or perhaps a patient had recently changed his address?
Fret not! Simply update his particulars using the edit command!
Alias: e
Format: edit INDEX [n/NAME] [p/PHONE] [e/EMAIL] [a/ADDRESS] [t/TAG]…
|
Thing(s) to note:
|
|
Pro tip(s):
You can remove all of a patient’s tags by typing the t/ prefix without specifying any tags.
|
Upon successful execution, you should see the patient’s details updated in the patient list on the left.
Examples:
-
edit 5 p/98534228 e/clawyq@cs2101.com
Updates the phone number and e-mail address of the 5th patient in the list to98534228andclawyq@cs2101.comrespectively, as shown below.
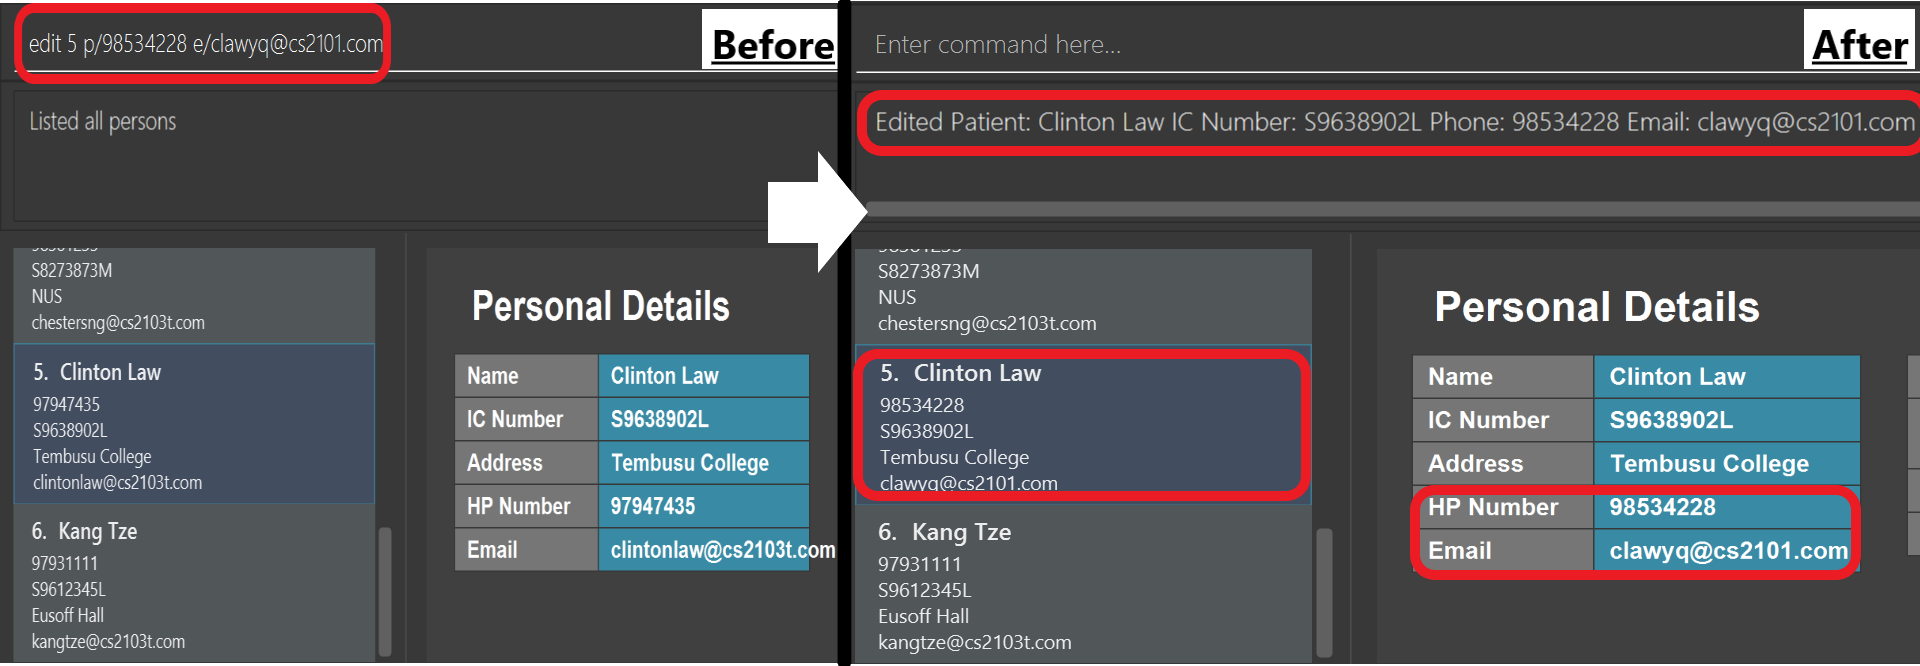
edit command specified above.4. Contributions to the Developer Guide
Given below are the sections I have contributed to the Developer Guide. They showcase my ability to write technical documentation and the technical depth of my contributions to the project. |
Document
Implementation of Document
The Document abstract class represents all the documents that can be issued by the clinic. The Receipt,
MedicalCertificate and ReferralLetter concrete classes, which respective commands will be referred
to henceforth as document related commands, all inherit from it. It can be thought of as a formatter that
specifies and organises the common information that all these documents must have with the help of the DocumentTemplate.html
template file.
Shown below is a class diagram illustrating how Document, Receipt, MedicalCertificate and
ReferralLetter relate to one another.
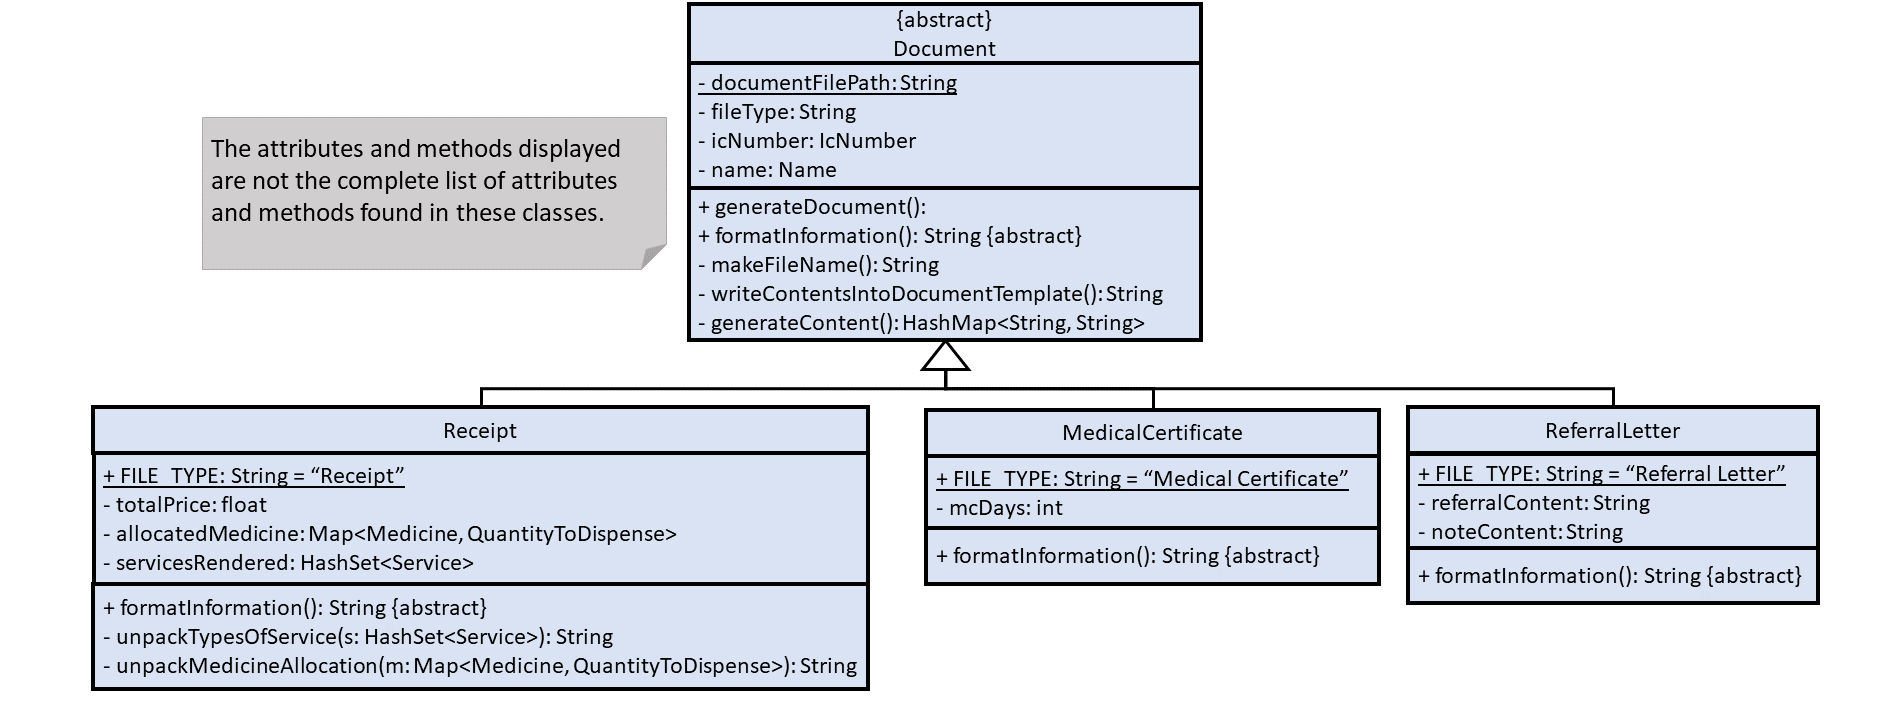
Document and document related classes are implemented.As the formatter which directs how the documents are built from the DocumentTemplate.html template, the Document
abstract class itself cannot be instantiated. The Document abstract class has the following key features:
-
contains the
nameandicNumberattributes, extracted from theServedPatientfrom which theDocumentwas constructed from. -
has common methods like
generateContentto standardise the way in which the contents of theDocumentare formatted. -
has the
formatInformationabstract methodwhich the extending classes have to implement.
The following activity diagram summarises what happens internally when a document related command is executed.
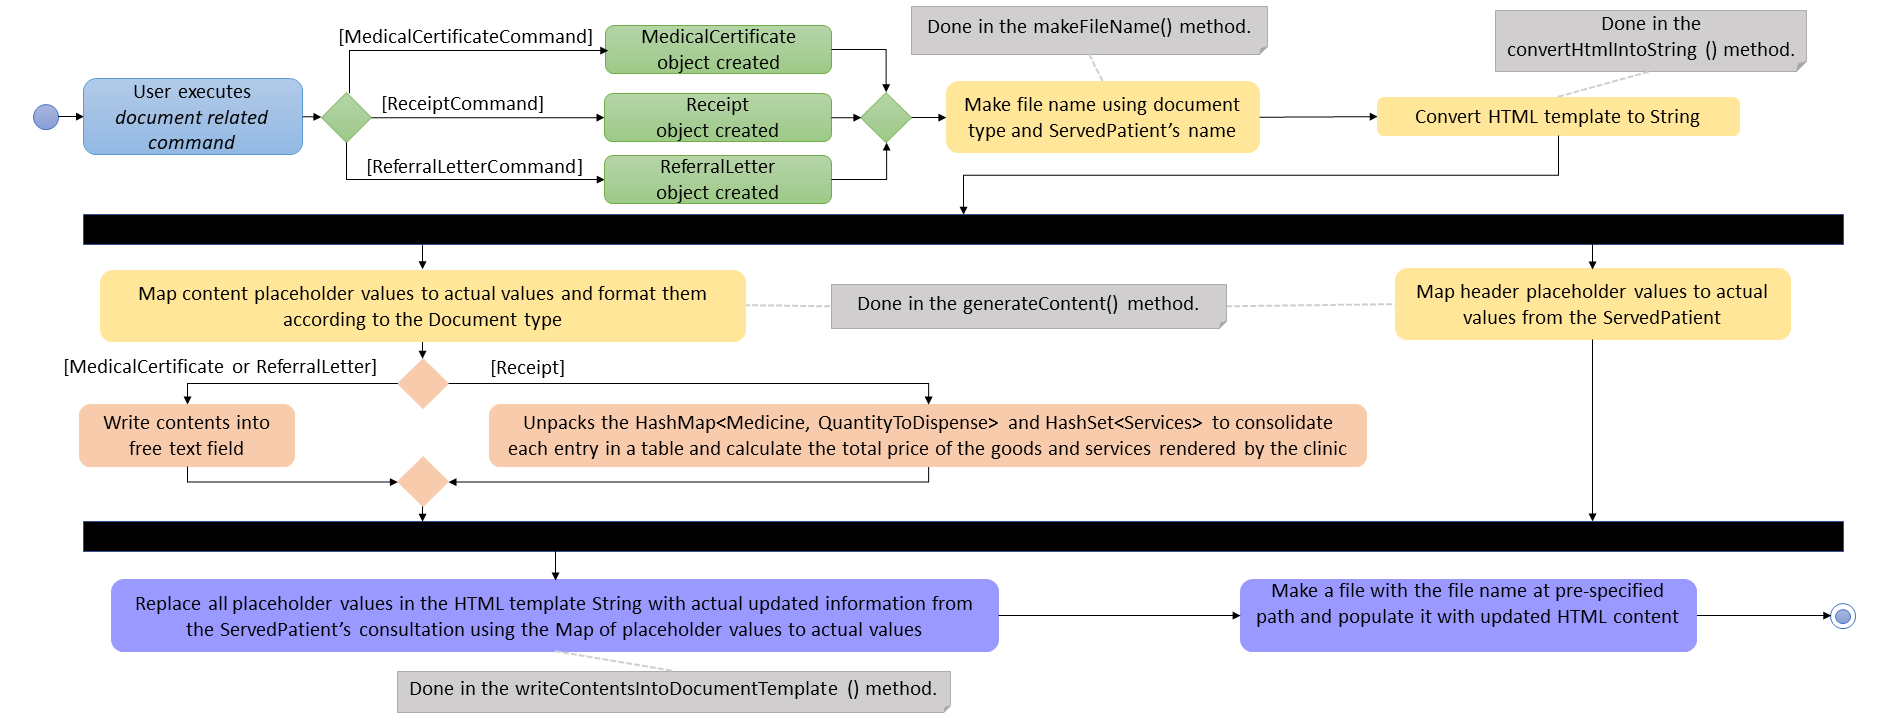
Document itself are labelled in the diagram.As seen in the above activity diagram, upon executing a document related command, the corresponding document will
be constructed from the ServedPatient object specified by the index that was passed in with the command,
as detailed in the following steps.
Step 1. The resulting document related object will call the generateDocument method, which will first make a unique fileName for the file to be created, identified by the type of Document, ServedPatient’s name and icNumber.
private String makeFileName() {
    return (fileType + FILE_NAME_DELIMITER + "For" + FILE_NAME_DELIMITER + name.toString()
        + FILE_NAME_DELIMITER + icNumber.toString())
        .replaceAll("\\s", FILE_NAME_DELIMITER)
        .replaceAll("(_)+", FILE_NAME_DELIMITER);
}|
The |
Step 2. The DocumentTemplate.html file is then converted into a string. It is a template with placeholder
values prefixed by a $ that will be replaced with the actual information pertaining to the ServedPatient’s
consultation.
Shown below is the code snippet that converts the DocumentTemplate HTML file into a string.
private String convertHtmlIntoString() {
    StringBuilder contentBuilder = new StringBuilder();
    try {
        BufferedReader in = new BufferedReader(new FileReader(COMPLETE_TEMPLATE_PATH));
        String str;
        while ((str = in.readLine()) != null) {
            contentBuilder.append(str).append("\n");
        }
        in.close();
    } catch (IOException e) {
        System.out.println(TEMPLATE_LOCATE_FAILURE_ERROR_MESSAGE);
    }
    return contentBuilder.toString();
}
Step 3. The generateContent method will then be called within the writeContentsIntoDocumentTemplate method.
The generateContent method will construct a HashMap of string to string key-value pairs. The keys are the aforementioned
placeholder strings prefixed by $ found in the HTML template, while the values are the corresponding information that are to
substitute the placeholders in the HTML template(keys). The writeContentsIntoDocumentTemplate method will then use the
key-value pairs found in the HashMap created by the generateContent method to replace the placeholder values in the
HTML template.
private String writeContentsIntoDocumentTemplate() {
    String htmlContent = convertHtmlIntoString();
    String title = fileType + " for " + this.name;
    htmlContent = htmlContent.replace("$title", title);
    HashMap<String, String> fieldValues = this.generateContent();
    for (Map.Entry<String, String> entry : fieldValues.entrySet()) {
        String key = entry.getKey();
        String value = entry.getValue();
        htmlContent = htmlContent.replace(key, value);
    }
    return htmlContent;
}

private HashMap<String, String> generateContent() {
    HashMap<String, String> informationFieldPairs = new HashMap<>();
    informationFieldPairs.put(HEADER_PLACEHOLDER, generateHeaders());
    informationFieldPairs.put(NAME_PLACEHOLDER, name.toString());
    informationFieldPairs.put(ICNUMBER_PLACEHOLDER, icNumber.toString());
    informationFieldPairs.put(CONTENT_PLACEHOLDER, formatInformation());
    return informationFieldPairs;
}
Step 4. Now that the HTML template is a string with the placeholder values replaced by the correct information, a BufferedOutputStream
is used to write the updated string into the HTML file, concluding the generation of the Document HTML file.
Design Considerations
Aspect: Implementation of the Document
-
Alternative 1 (current choice): Use an
abstract classto implementDocument.-
Pros:
-
Allows inheriting classes to use a standardised method to format common information while granting them the flexibility of structuring the contents unique to its document type by means of
abstract methods.
-
-
Cons:
-
Prevents inheriting classes from becoming an
EnumasJavadoes not supportmultiple inheritance, since allenumsimplicitly inherit fromEnum. -
More computationally expensive than an
interfacedue to the overhead incurred looking up inherited methods and various class members.
-
-
-
Alternative 2: Use an
interfaceto implementDocument.-
Pros:
-
Can convert inheriting classes to
enums, ensuring that the inputs fed to these classes are valid.
-
-
-
Cons:
-
Unable to standardise the way inheriting classes implement the
generateHeadermethod.
-
4.2. Implementation of the Receipt class
Implementation of Receipt
The Receipt class structure is as follows:
-
Contains a
Map<Medicine, MedicineQuantity>attribute to record the quantity dispensed of each type ofMedicineto theServedPatientfrom which theReceiptwas constructed from. -
Contains a
HashSet<Service>attribute to record theServicesadministered to the patient. -
Contains a
totalPriceattribute which stores the total price of all theServicesandMedicinesreceived by the patient during the consultation.
Users can generate a Receipt for a specific ServedPatient by invoking the ReceiptCommand accompanied by the
ServedPatient 's index in the ServedPatientList. The below sequence diagram illustrates how the ReceiptCommand works.
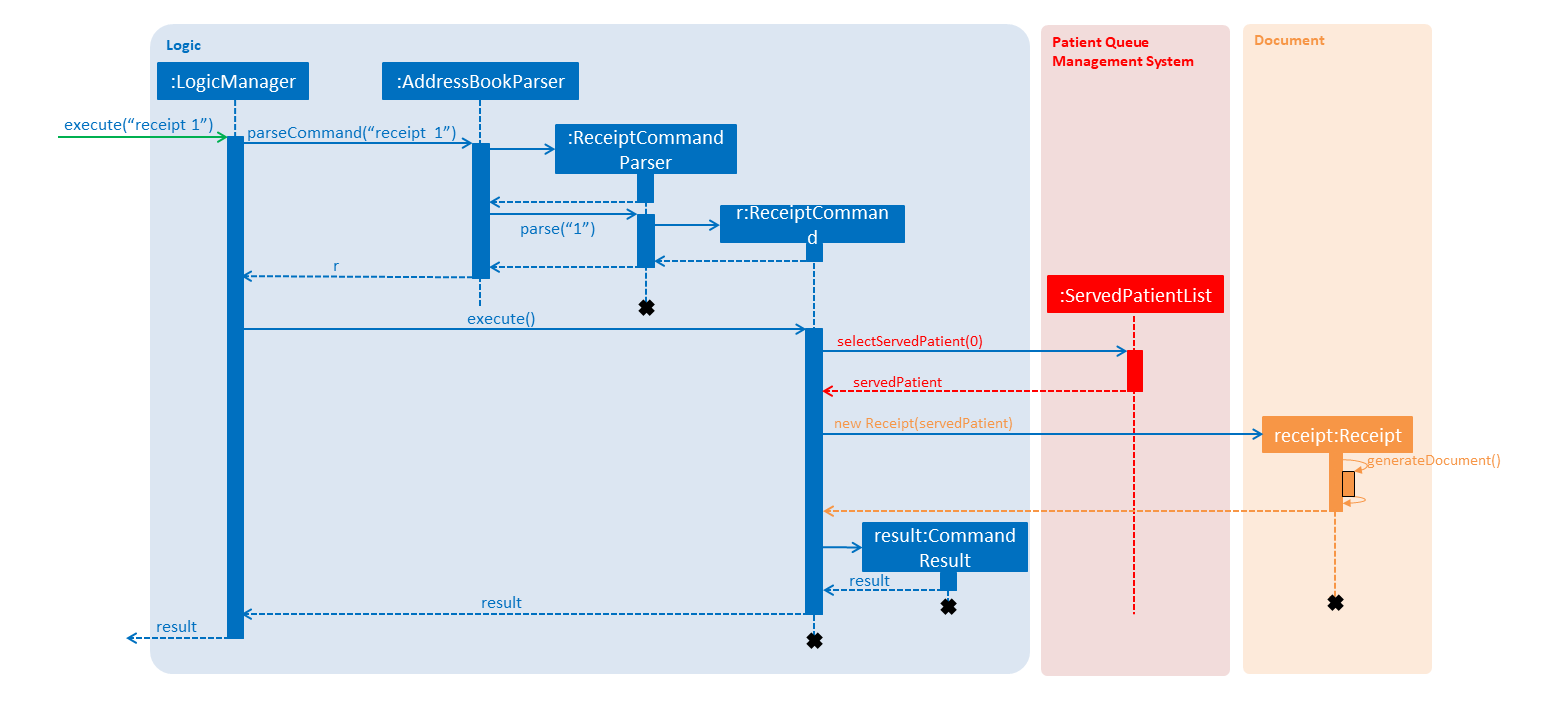
When the ReceiptCommand is executed, it constructs a new Receipt object and extracts the relevant information
from the ServedPatient specified by the index.
Shown below is how the Map<Medicine, MedicineQuantity> of a ServedPatient is unpacked to sieve out the individual
table entries for the cost of different medicines.
    private String unpackMedicineAllocation(Map<Medicine, QuantityToDispense> medicineAllocated) {
        StringBuilder stringBuilder = new StringBuilder();
        for (Map.Entry<Medicine, QuantityToDispense> entry : medicineAllocated.entrySet()) {
            Medicine medicine = entry.getKey();
            String medicineName = medicine.getMedicineName().toString();
            int quantity = entry.getValue().getValue();
            float pricePerUnit = Float.parseFloat(medicine.getPricePerUnit().toString());
            float totalPriceForSpecificMedicine = pricePerUnit * quantity;
            increaseTotalPriceBy(totalPriceForSpecificMedicine);
            stringBuilder.append("<tr><td>")
                    .append(medicineName)
                    .append(super.HTML_TABLE_DATA_DIVIDER)
                    .append(quantity)
                    .append(super.HTML_TABLE_DATA_DIVIDER)
                    .append(String.format("%.02f", pricePerUnit))
                    .append(super.HTML_TABLE_DATA_DIVIDER)
                    .append(String.format("%.02f", totalPriceForSpecificMedicine))
                    .append("</td></tr>");
        }
        return stringBuilder.toString();
    }